Related Articles
Introduction
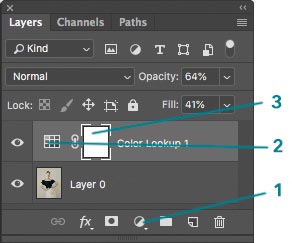
- Photoshop Colour Lookup Tables (3D LUTs) are single click, non-destructive, colour adjustment layers which you can create and save. They are the sum of any number of adjustment layers all added together and saved as one effect, which makes it a very convenient way of saving particular colour toning looks.
Adding a Colour Lookup Table
|
 |
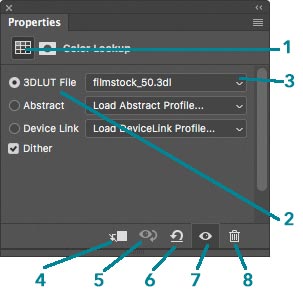
The Properties Panel
|
 |
Using Colour Lookup Tables
- Photoshop comes with a number of LUTs already loaded, which you can access from the Properties Panel as shown above. However, the only way to use them is to click on the LUT and apply it as there is no preview. This is not very convenient.
- This can be overcome by looking at Introduction to Photoshop Lookup Tables by Matt K. This article has a video and contains a link to the free download of his Layer Comps file where you can add your image to this Photoshop file, merge it down with his background image and then play the whole series of LUTs by pressing the arrow keys. This is by far the easiest way of visualising these effects.
- Tone down the effect of a LUT by reducing the layer opacity, altering the blend mode, using Blend If or using masks, such as a Luminosity Mask.
Creating and Saving Your Own LUTs
- You can create and save your own LUTs. These will be a series of Adjustment Layers, which can include other LUTs but can include any type of adjustment layer.
- To protect skin tones use Blend If to either take the effect off the skin tone in the Red Channel, or alternatively take it off the Green and Blue Channels to target the skin tones. (See Phlearn for the full details. Subscription only).
- To save your own LUT you must only have the adjustment layers you want to save and the background layer selected when you do this. Then go to File > Export > Colour Lookup Tables ... . There are several formats as options to save but Photoshop uses the CUBE format. This file can be brought back into any other document from the LUT Propertied Panel in the 3D LUT File menu, using the top option of Load 3D LUT, however this does not add it to the permanent list of LUTs. To add them permanently go to Applications > Photoshop> 3D LUTS and drag and drop the files there. They will now appear on the permanent list when Photoshop is restarted. (Ref 4:15). (See Phlearn for the full details. Subscription only).
- f64 Academy groups all the adjustment layers into a group, selects the group, then exports. Save as a Quality of 64 Grid Points (High). Format as ICC Profile for maximum compatibility. He also discussed where to store your saved files, which isn't as easy as it should be. (Ref 5:35).
- There is now a better way to save your LUTs using Adobe Creative Cloud Libraries which store all the adjustment layers as a smart object which can be brought back from the library in an editable form, so that you can fine tune adjustments for a new image. (See A Better Way to Store Colour Lookup Tables).
- LUTS can also be loaded into Lightroom, where they are called Profiles. Go to File > Import Develop Profiles and Presets. However Lightroom needs the .xmp files rather than the .CUBE files which Photoshop uses. To create an .xmp file open your image in Photoshop Camera RAW and OPTION + Click on the icon at the bottom of the page to open up a completely different dialogue than just clicking on it. This lets you load a .CUBE file into Camera RAW, which then also shows up in Lightroom as an .xmp file. (See Phlearn for the full details. Subscription only).
- Movie LUTs website.
Articles
- Introduction to Photoshop Lookup Tables by Matt K. Article, video and free download of his Layer Comps file.
Videos
- How to Use and Create Photoshop Look Up Tables #109 by Glyn Dewis
- How to Use Colour Lookup Tables in Photoshop by f64 Academy
- Colour Grading in Photoshop using LUTs + (FREE LUTs) by Moe Zainal
- Colour Grading Landscape Photography with Photoshop LUTs by Robin Whalley
Plugins
- 3D LUT Creator (***) - Recommended by Pratik Naik. $99 to $249. Amazingly powerful and simple colour adjustments.
- Image2LUT - Fstoppers Review.